Hacking the HughesNet HT3000W Satellite Modem | Part 2
Recap
We left off with a lot to be figured out! We have a good understanding of how the device is put together after examining the NAND dump and figuring out how to pull it apart, but we never figured out how to put it back together, with changes. For this part, I had some help from a few cool member’s of Matt Brown’s IoT Hacker Hideout Discord server (invite), namely Huyn helped figure out the ECC and the polynomial used.
Error Correcting Code (ECC)
I’ve briefly mentioned ECC (or Out of Bounds Data (OOB)) on other posts, but I’ll dive in a bit more as it is warranted to understand what happens here. ECC is used by NAND flash chips to detect and correct errors which can and do occur, and also to mark a block as bad (worn out, unusable). Errors and wearing can happen due to a variety of reasons, though most often are caused by lots of use, heat variations or sometimes there are just bad blocks right out of the factory. If a block contains errors but it is not completely worn out, ECC may be used to correct the data. Other times, ECC can mark a block so that the controller will no longer use it. I’m no math wiz, but I’ll try to elaborate a bit more.
Bose-Chaudhuri-Hocquenghem (BCH)
BCH code is one of many error correction codes used, though is one of the more popular ones. Reed-Solomon code is another that is commonly used. If you really don’t understand the concept, it’s probably a good idea to check out YouTube Academy. Put simply, data is treated as a polynomial over a finite field (Galois Field) and then the ECC parity is appended. Using some mathematics, errors can be detected and depending on the number of errors, the correct data can be recovered as well.
Device Tree Secrets
The Device Tree was conceived back in the PowerPC days. It is simply a tree containing a description of a system’s components and how they are connected or used in said system. The device tree contains anything from a system’s SoC to clocks, interrupts, networking devices, LEDs, storage, you name it. Fortunately, most every embedded Linux device today has one and the one used in the HT3000W shares some of the secrets.
1
2
3
4
5
6
7
8
9
10
europa_nand@20000000 {				# NAND is mapped at 0x20000000.
	compatible = "hughes,europa-nand";	# The "compatible" property is used to bind the correct driver.
	reg = <0x00 0x20000000 0x00 0x9000>;	# NAND is mapped at 0x20000000 and spans 0x9000.
	nand-ecc-mode = "hw";			# Likely indicates it is hardware ECC.
	nand-ecc-algo = "bch";			# The ECC algorithm is BCH
	nand-ecc-step-size = <0x200>;		# The ECC algorithm covers 0x200 (512) bytes of data.
	nand-ecc-strength = <0x04>;		# The number of bits to correct per step (per 512 bytes).

	...					# Other stuff is here, like the partition table.
};
The NAND’s datasheet indicates that this chip has 2048-byte pages and 128 bytes of ECC space. One erase block consists of 64 pages, so 2176 * 64 = 139264 bytes per block. The device tree tells us that it is capable of correcting 4 bits per 512-bytes of data, but we need to know the polynomial. Huyn wrote a tool to bruteforce it, and it turns out that the correct polynomial is 9647. The bruteforce works by taking a 512-byte chunk of data and generating the ECC for all possible polynomials until it matches what is found in the NAND dump.
Figuring Out the ECC Data
Consider the first 2176 (2048 + 128) bytes of the raw NAND:
1
88E00100000000001000001A00000000800A0058210080D2010000F9600A0058810A0058010000F9A00038D5001C4092C00200B560FE0E1000201ED5E108001841201ED5E1FD0C5801A21ED500F239D5000C67B200F219D520F239D500007AB220F219D500103ED500007EB2000074B2000040B200101ED5FF4F03D59F3F03D5DF3F03D5CD0000148007005800E01BD500E13CD5000040B200E11CD57FE01CD5FF4F03D509008012C0060058E1060058098000B929008052090001B929008052290000B909108052290400B95F111ED50006005800101CD50006005840111CD5E003009100411ED500113ED5000076B200007BB200007CB2000040B200111ED5200180D200087AB200401ED56000001020401ED5E0039FD65F2003D520040058001018D5E003009100411CD500113CD5000061B2000063B200111CD5A00080D200401CD56000001020401CD5E0039FD65F2003D5DF00001418258280000000000000380C000000001801B805000000000040004000000000904E5A03000000000010000E000000000020000E000000003008C53000000000FF330000000000000008D03000000000010880D20000031101E0A1F2200000B9FFFFFF17820F80D20380A1D20280A1F20100403941000035C0035FD6440040B9E4FF0F3600040091610000B9F9FFFF17010492D2E2C701320180A1F2220000B9F1FFFF17FE0F1FF8F44E2E5CD07802004000009000000991EDFFFF9740000090001C0991EAFFFF9745000090A5A80991E00305AAE6FFFF974000009000B80991E3FFFF97E00305AAE1FFFF974000009000840991DEFFFF974000009000E80991DBFFFF97000286D22080A1F2050040B9BF4840F28000005440000090005C0A91D3FFFF97BF4440F28000005440000090006C0A91CEFFFF97BF4040F28000005440000090007C0A91C9FFFF97FE0741F84000009000B80C91C5FFFF17000180D20092A1F2010040B9000492D20080A1F2E1020035E1C70132820080D2010000B90280A1F2000280D20080A1F2610080525F0000B9E3008052010000B9000180D20080A1F2E4018052030000B963108052030400B90380A1D2640000B923008052430000B9010400B9C0035FD6013090522130B072E9FFFF17000092D2F37BBFA90080A1F20160A052010000B9130C40B9732648D3E003132A77070094800180D200B7A0F2F300003521008052010000B94000009000880A91F37BC1A894FFFF177F060071C100005441008052010000B94000009000FC0A91F8FFFF177F0A0071C100005481008052010000B94000009000700B91F1FFFF171F0000B94000009000D80B91EDFFFF17009290D2F37BBEA900E0A0F22100805206000090010000B9002580D200B7A0F2E1830532C6400091010000B90092A1D241008052010000B9A10180521F0000B960008052E01F00B97C011E5B2A100C00FF1B00B9E01B40B91FDC2E714D050054A7FFFF977AFFFF970040A1D2811080D201B7A0F21F7C00291F7C01291F7C02291F7C0329000280D200B7A0F2060000B9061000B9062000B9200040B9000812121F704071A1FFFF54139290D24000009013E0A0F200480C9155FFFF9740008052600200B9ADFFFF97000286D22080A1F2000040B900304AD31F140071E0179F1A6100009460008052600200B9CA000094000880D20118805200E0A1F2010000B9FFFFFF17E01F40B9007C011BE01F00B9E01B40B900040011E01B00B9CEFFFF17F37BBFA91328A052152000941300130B73721D53737E4093600240B960000035600640B900010034600240F900003FD6000880D20118805200E0A1F2010000B9FFFFFF170D200094F4FFFF17E10000D0228000913F2000B9400440B900040011400400B91F5C007169000054400082521AFFFF17C0035FD6000090D2811D80520000A4F20160B072FF0302D1010000B90100A852010000B9018080D201E0A1F2200040B9E0FF0F37030890D2E1230091000080D20300A4F2620040B902682138000400911FC401F181FFFF54000090D2C11F80520000A4F2010000B9E0C98952C028A972E10B40B93F00006B8000005460008252FF030291F8FEFF17E10000F020200191E25B40B9224800B9E1BB4079010400B9E16740B9010800B9E16B40B9010C00B9E1B34139011000B9E1B741393A1EED6EA7F00000011400B9E1E34139011800B9FF030291C0035FD6F353BEA9010490D20100A4F282428152FE0B00F9C2C3A372220000B9E21F8A52C223A372220400B90280825222C3A172220800B902608052220C00B9010090D2E21F80520100A4F2220000B9820690D20200A4F2410040B9E1FF4736030090D2040E8052020890D20300A4F20400B0720200A4F2640000B9410040B9C1FF3736F40000F09322019100060034AAFFFF97601A40B9001000511F200071E8060054410000B021A00E9122486038844A40B9817C0A53211000513F30007128060054400000B000A00E91002400910348613861824129217C001B600A40B9847C001B217C041B217C1B533F100071A0050054C80400543F040071E0079F1A00100011611640B9005C18530038032AFE0B40F9210810532258022A010690D24000002A0100A4F20201A1520000022A200000B9800790D20000A4F201088052010000B9F353C2A8C0035FD600008152804A00B900088052608200290080805261008052600E00B920008052601200B9611600B9601A00B9C7FFFF1702008052CCFFFF1703008052D3FFFF173F200071E00000543F400071A0008052E003801AD9FFFF17C0008052D7FFFF17E0008052D5FFFF17F353BBA9E00000D013800091148190D2F55B01A9160090D2F76302A9188080D20101C0D2FFFFFFFFFFFFFFFFFFFFFFFFFFFFFFFFFFFFFFFFFFFFFFFFFFFFFFFFFFFFFFFFF96B03A9190E805217008052011000F91600A4F21900B0729FDD8CF858D70200FFFFFFFFFFFFFFFFFFFFFFFFFFFFFFFFFFFFFFFFFFFFFFFFFFFFFFFFFFFFFFFFFFFFFFFFFFFFFFFFFFFFFFFFFFFFFFFFFFFFFFFFFFFFFFFFFFFFFFFFFFFFFFFF
Part 1 revealed a structure like so:
- 512 valid bytes
- 8 OOB bytes
- 512 valid bytes
- 8 OOB bytes
- 512 valid bytes
- 8 OOB bytes
- 488 valid bytes
- 32 OOB bytes
- 24 valid bytes
- 8 OOB bytes (488 + 24)
- 64 OOB bytes
4-bit ECC strength means there will be 7 bytes of ECC. So, let’s test the theory:
1
2
3
4
5
6
7
8
9
#!/usr/bin/env python3

import bchlib

bch = bchlib.BCH(4, prim_poly=9647, swap_bits=True)
data = bytes.fromhex('88E00100000000001000001A00000000800A0058210080D2010000F9600A0058810A0058010000F9A00038D5001C4092C00200B560FE0E1000201ED5E108001841201ED5E1FD0C5801A21ED500F239D5000C67B200F219D520F239D500007AB220F219D500103ED500007EB2000074B2000040B200101ED5FF4F03D59F3F03D5DF3F03D5CD0000148007005800E01BD500E13CD5000040B200E11CD57FE01CD5FF4F03D509008012C0060058E1060058098000B929008052090001B929008052290000B909108052290400B95F111ED50006005800101CD50006005840111CD5E003009100411ED500113ED5000076B200007BB200007CB2000040B200111ED5200180D200087AB200401ED56000001020401ED5E0039FD65F2003D520040058001018D5E003009100411CD500113CD5000061B2000063B200111CD5A00080D200401CD56000001020401CD5E0039FD65F2003D5DF00001418258280000000000000380C000000001801B805000000000040004000000000904E5A03000000000010000E000000000020000E000000003008C53000000000FF330000000000000008D03000000000010880D20000031101E0A1F2200000B9FFFFFF17820F80D20380A1D20280A1F20100403941000035C0035FD6440040B9E4FF0F3600040091610000B9F9FFFF17010492D2E2C701320180A1F2220000B9F1FFFF17FE0F1FF8')

ecc = bch.encode(data)
print(ecc.hex())
We’re returned f44e2e5cd07802, it’s a match! But you’ll notice there’s a trailing 0x00. I’m not positive what it means, though my best guess is it is a bad block marker.
The 24-byte chunk can be concatenated to the 488-byte chunk to create a 512-byte data section, and the last 8-byte ECC code covers it. The 32-byte and 64-byte sections typically seem to be all 0xFF, and thus I’m not currently sure what they’re used for. I’m not even sure why the last data section is split, perhaps an peculiar design idea.
Unsorted Block Images (UBI)
UBI is a mechanism used on NAND flash for managing wear leveling and volume management. It lives a layer above MTD, but below UBIFS, which is a filesystem designed to live on top of UBI. At a high level, each Physical Erase Block (PEB) will have a UBI header that contains the erase count header. This is denoted by the UBI# string you may see. You can read all the details about UBI here; I won’t bother to explain it all. As it turns out, for this device, if the PEB is unused, the ECC is only valid for the first page. The rest of the pages in the block may have incorrect or null ECC.
Next, you may notice the UBI! string, which is the UBI Volume Identifier header. This header appears after the first page in the PEB, and contains information such as what volume the block belongs to. When a block belongs to a volume, all the ECC code is valid.
Exploiting With Our Friend, englab.dat
Before we get started, be sure to check out my post about the HT2000W to see how englab.dat was used in the past. To quickly recap, we had established a serial connection to the HT2000W with root access. We were about to directly write to the flash chip and create /fl0/englab.dat. Hughes’ engineering team stepped it up a notch this time and disabled serial for production builds.
Mounting the NAND Dump
Once again, let’s mount the NAND dump with ECC removed. This time, we’re only going to care about mtd5/fl0. First, we create the simulated mtd device.
1
sudo modprobe nandsim id_bytes=0x01,0xac,0x90,0x15,0x56 parts=0x8,0x10,0x8,0x1e0
Then, we write the dump to the mtd partition.
1
sudo nandwrite /dev/mtd4 ht3000w-fl0.bin
We then create a mount point for it, load the ubi driver and mount it.
1
sudo mkdir -p /mnt/fl0
1
sudo modprobe ubi mtd=/dev/mtd4,2048
1
sudo mount -t ubifs /dev/ubi0_1 /mnt/fl0
Intuition might lead you to try grepping in /mnt/fl0 for englab.dat, but this partition is mounted after the kernel boots and initramfs is loaded. /mnt/fl0/boot/ has an xz-compressed cpio archive called initramfs_data.cpio.xz. Let’s see what’s in it.
1
2
3
4
mkdir -p /tmp/initramfs && cd /tmp/initramfs
cp /mnt/fl0/boot/initramfs_data.cpio.xz .
xz -d initramfs_data.cpio.xz
cpio -iv < initramfs_data.cpio
Now, we can try grepping.
1
2
3
4
5
sudo grep -ri "englab.dat" .
grep: ./initramfs_data.cpio: binary file matches
./usr/bin/sshconfig.sh:if [ -e /fl0/englab.dat ] || [ "$2" = "enableroot" ]; then
./etc/init.d/flashlink:if [ $res -ne 0 ] || [ -f /fl0/englab.dat ] ; then
./etc/init.d/flashlink:if [ -f /fl0/englab.dat ] ; then
./etc/init.d/flashlink has the following:
1
2
3
4
5
6
7
8
9
10
11
res=$(devmem2 0x0C900008 w | grep -c "0x00000000")
if [ $res -ne 0 ] || [ -f /fl0/englab.dat ] ; then
    /usr/bin/sshconfig.sh 0.0.0.0 "enableroot"
fi

# Change root passwd to good old one
if [ -f /fl0/englab.dat ] ; then
    sed "s/^root:.*:17022:0/root:JPji6SfLPRjRs:17022:0/g" < /etc/shadow > /tmp/shadow
    mv /tmp/shadow /etc/shadow
    chmod 000 /etc/shadow
fi
The descrypt hash is the same as the HT2000W (root:supernova), and it looks like there’s an init script checking if /fl0/englab.dat exists, so it seems if we can create it, we can open SSH!
The other interesting part of this script is it reads from 0x0C900008, which falls in the eFuse range from the device tree:
1
2
3
4
eFuse@C800000 {
	compatible = "hughes,swp-eFuse";
	reg = <0x00 0xc800000 0x00 0x100200>;
};
You may be considering that if the engineers blew eFuses to designate a board as production vs development, then they probably used them to also implement secure boot. However, traditional secure boot implementations require a private key to sign a static chunk of data, like a kernel or rootfs. The private key should only belong to Hughes, and should be under strict access control. Given that fl0 is dynamic storage designed to be modified at any time, it can’t be signed, thus it can’t be cryptographically verified by a signature. If you’re still not catching on, it means there should be no intentional security in our way.
Repacking a Modified and Flashable UBI Image
WARNING
The follow assumes you have NO bad blocks. If your NAND has any bad blocks, you may have issues.
We already have the filesystem mounted on /mnt/fl0, so we can simply sudo touch /mnt/fl0/englab.dat. However, we need to generate a new UBI image with these changes. Let’s utilize ubireader_utils_info to automatically generate us some build and configure scripts.
1
2
3
4
5
6
7
8
9
10
11
12
13
14
15
16
17
18
19
20
21
22
23
24
25
26
27
28
29
30
31
$ sudo ubireader_utils_info ht3000w-fl0.bin

Volume fl0
	alignment	-a 1
	default_compr	-x lzo
	fanout		-f 8
	image_seq	-Q 1800224575
	key_hash	-k r5
	leb_size	-e 126976
	log_lebs	-l 5
	max_bud_bytes	-j 8388608
	max_leb_cnt	-c 3584
	min_io_size	-m 2048
	name		-N fl0
	orph_lebs	-p 1
	peb_size	-p 131072
	sub_page_size	-s 2048
	version		-x 1
	vid_hdr_offset	-O 2048
	vol_id		-n 1

	#ubinize.ini#
	[fl0]
	vol_type=dynamic
	vol_flags=0
	vol_id=1
	vol_name=fl0
	vol_alignment=1
	vol_size=444416000
Writing to: ubifs-root/ht3000w-fl0.bin/img-1800224575/create_ubi_img-1800224575.sh
Writing to: ubifs-root/ht3000w-fl0.bin/img-1800224575/img-1800224575.ini
This tool will create a script that gives us the parameters to create a new UBI image:
1
2
3
4
$ cat ubifs-root/ht3000w-fl0.bin/img-1800224575/create_ubi_img-1800224575.sh
#!/bin/sh
/usr/sbin/mkfs.ubifs -m 2048 -e 126976 -c 3584 -x lzo -f 8 -k r5 -p 1 -l 5 -r $1 img-1800224575_0.ubifs
/usr/sbin/ubinize -p 131072 -m 2048 -O 2048 -s 2048 -x 1 -Q 1800224575 -o img-1800224575.ubi img-1800224575.ini
The only thing we need to do is update the ini file to allow automatic volume resizing once the image is written to disk. To do this, we change vol_flags=0 to vol_flags=autoresize in ubifs-root/ht3000w-fl0.bin/img-1800224575/img-1800224575.ini. And now we can create the UBI image.
1
cd ./ubifs-root/ht3000w-fl0.bin/img-1800224676/ && sudo ./create_ubi_img-1800224575.sh /mnt/fl0
This creates img-1800224575_0.ubi, which is our new UBI image.
Generating ECC
With a UBI image, we now need to re-create the ECC so the NAND controller can operate correctly. A python script can do this for us:
1
2
3
4
5
6
7
8
9
10
11
12
13
14
15
16
17
18
19
20
21
22
23
24
25
26
27
#!/usr/bin/env python3
import bchlib

bch = bchlib.BCH(4, prim_poly=9647, swap_bits=True)

with open("img-1800224575_0.ubi", "rb") as in_file, open("fl0.ecc", "wb") as out_file:
    while True:
        # Process 3 normal 512-byte chunks
        for _ in range(3):
            data = in_file.read(512)
            if not data:
                exit(0)  # EOF
            ecc = bch.encode(data)
            out_file.write(data + ecc + b'\x00')

        # Process the 4th (special) 512-byte chunk
        data = in_file.read(512)
        if not data:
            break  # EOF

        ecc = bch.encode(data)
        out_file.write(data[:488])        # first 488 bytes
        out_file.write(b'\xFF' * 32)      # 32-byte filler
        out_file.write(data[-24:])        # last 24 bytes
        out_file.write(ecc)
        out_file.write(b'\x00')
        out_file.write(b'\xFF' * 64)
Again, this assumes the NAND has NO bad blocks. The generated fl0.ecc can now be directly written back to the NAND, at the appropriate offsets of course. Let’s power it on and see if SSH is open.
1
ssh root@192.168.0.1
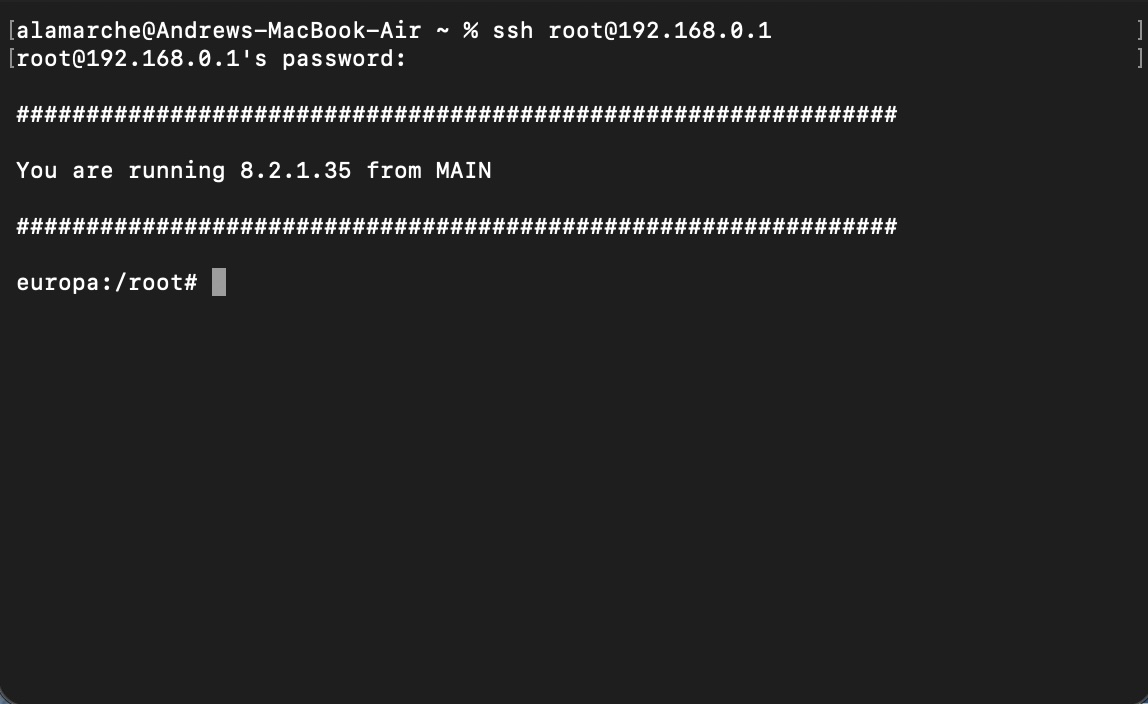
A pleasant surprise, indeed!
Summary
To summarize the steps we’ve taken in order to get root:
- We dumped the NAND by lifting the chip and placing it in a programmer.
- We (with help) figured out the ECC design and figured out how to generate it.
- We used nandsim and some UBI tools to simulate a NAND device that uses UBI.
- We created the
englab.datfile on the simulated filesystem. - We dumped the original UBI configuration to be able to re-create a compatible image.
- We created the UBI image and added the correct ECC.
- We flashed the image back. And finally,
- We got root!